

Wild Zone 2 in Pokemon Legends Z-A: what the area is and how to clear it
Wild Zone 2 in Pokemon Legends Z-A sits on the south side of Lumiose City and acts as the second gated wild zone players enter after the opening act. The area mixes riverbank paths, low fences, and tall grass against a backdrop of mid-rise buildings, and that mix gives it a specific role: it is a controlled bridge between the prologue zone and the more demanding zones that come later. Because the river edges and the grass tiles both carry encounters, Wild Zone 2 quietly introduces the dual-terrain pattern that repeats in nearly every later zone, so learning the layout here pays off well past a first visit.
For a player who just finished the prologue, Wild Zone 2 is also where the new battle mechanics of Pokemon Legends Z-A start to feel like a real system. The 3D movement, the visible turn order, and the Mega Evolution-adjacent combat layer all become easier to read when the encounter pool is short and the opponent levels are predictable. Because of that, the zone doubles as a teaching area, and the way you move through it shapes how the rest of the game reads. This guide treats Wild Zone 2 as a self-contained map, lays out the encounter pool you can expect to meet, and walks through the order of objectives that fits both solo play and small co-op runs.
Where Wild Zone 2 is located and how to reach it
The fast travel point that anchors Wild Zone 2 is on the south edge of the city map, near a gate that opens into a paved path with a small bridge over a slow river. From the central hotel or the southern plaza, the route is short: head out through the south gate, follow the elevated road until the buildings thin out, and the wild zone entrance appears at a small checkpoint guarded by an NPC who restates the rules for catching Pokemon. There is no puzzle at the gate, but there is a soft level recommendation displayed next to the entrance, and that number is the simplest way to judge whether you should detour into training first.
The reason the south approach matters is the design intent behind the zone. Wild Zone 2 is built so that a player who rushes south from the prologue hits a difficulty bump if their team is still at prologue level, while a player who has spent a few extra minutes in repeatable trainer battles in Zone 1 will glide through. This pacing is consistent with how the game uses its early zones to teach the cost of skipping preparation, and it is one of the clearer examples in Pokemon Legends Z-A of map placement doubling as a difficulty curve.
Layout of Wild Zone 2: biomes, paths, and boundaries
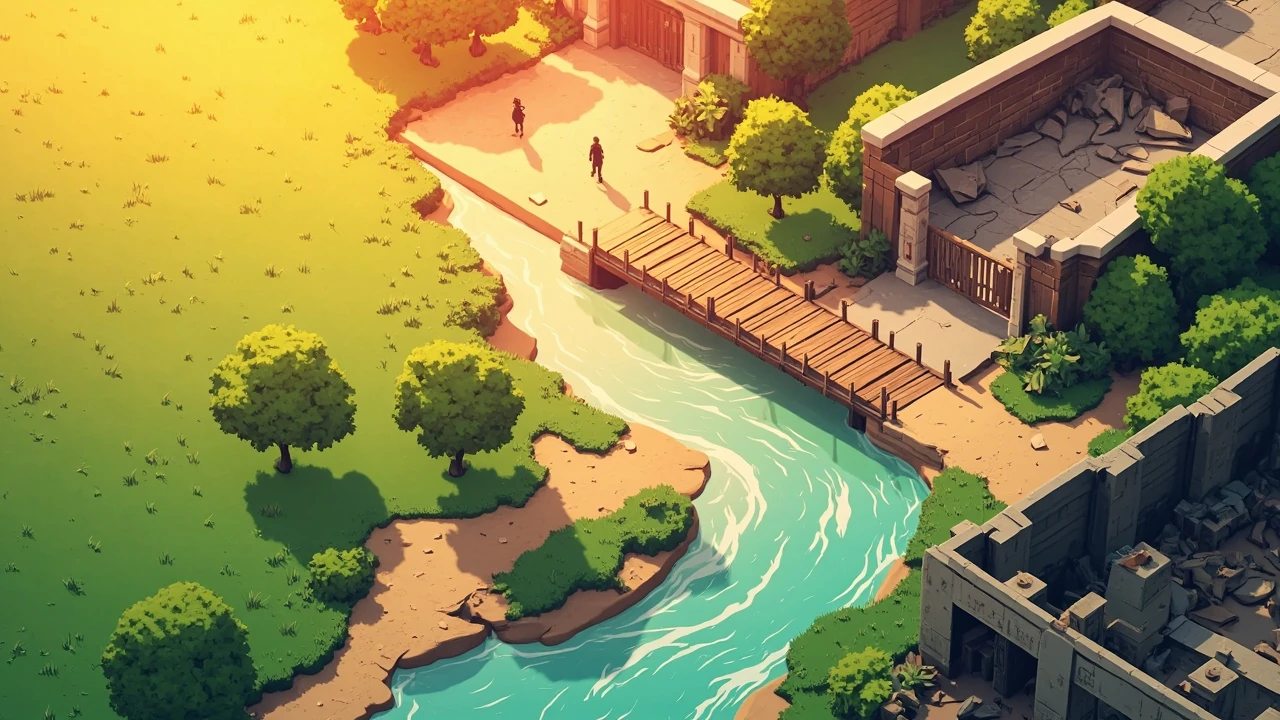
The zone is roughly oval, with three regions and a few connecting paths. The northern third is short grass and a few low fences; the middle third is a riverside stretch with a wooden bridge; the southern third is a mixed industrial-adjacent area with rubble, broken pavement, and a small fenced enclosure that the game uses for a mid-zone scripted event. The transition between these regions is gradual rather than gated, so the player can pick the path, and the encounter pool shifts to match the terrain.
The visual language of each subregion is also a hint about the encounter pool. Tall, bright green grass tends to host Bug- and Normal-type Pokemon; the riverbank and shallow water hold Water-type encounters; the broken pavement and industrial fence lines tend to hold Ground-, Fighting-, and Poison-type creatures. Because the map mixes these in close quarters, you can build a small team with surprisingly wide type coverage in a single visit, provided you actually move through all three regions rather than camping in the first patch of grass.
Key landmarks you should know before moving in
- The south gate checkpoint: the official entrance, used for fast travel back to the city.
- The wooden bridge: the visual center of the map and a useful mid-zone rest point where wild encounters briefly thin out.
- The fenced enclosure: a small arena that triggers a scripted event with a returning character and a guaranteed encounter at the end.
- The riverbank shelves: shallow water that is the primary source of Water-type encounters and where a few item pickups are hidden.
- The industrial rubble field: the source of Ground- and Fighting-type encounters and the only reliable place to pick up a specific mid-game evolution stone.
Wild Zone 2 Pokemon ZA encounter list by terrain
The encounter pool in Wild Zone 2 is small enough to learn in a single visit, which is part of why the game uses it as a teaching area. The table below groups Pokemon by where they appear most reliably, with the level range observed during normal progression. Levels assume a player who has just finished the prologue and is moving through the zone in story order; underleveled players should expect the lower end of each range, while players who have spent extra time in Zone 1 will see encounters clustered near the upper end.
| Terrain | Typical encounters | Level range | Notes for trainers |
|---|---|---|---|
| Short grass, north section | Bug-type and Normal-type early-route Pokemon | Lv. 12 to 16 | Best place to fill the first Bug-type slot in your party |
| Tall grass patches | Mixed Bug- and Grass-type encounters | Lv. 13 to 17 | Slightly higher level; useful for Grass-type coverage |
| Riverbank and shallow water | Water-type Pokemon, occasional dual-type | Lv. 14 to 18 | Required visit for a Water-type team member |
| Industrial rubble field | Ground-, Fighting-, and Poison-type encounters | Lv. 15 to 19 | Where mid-game evolution items begin to drop |
| Fenced enclosure (scripted) | One scripted encounter with a story-relevant Pokemon | Lv. 17 to 19 | Triggered automatically on first visit; do not approach until ready |
| Night-only (after story flag) | A small set of Dark- and Ghost-type additions | Lv. 15 to 20 | Unlocked after the related side quest in the hotel district |
Exact species vary by game version and patch, and the encounter pool expands slightly once the night cycle is unlocked, so the table is built around terrain and role rather than a fixed species list. If you are hunting for a specific Pokemon, the terrain column is the reliable filter: the same terrain keeps producing the same general pool, even when the surrounding story events shift.
Order of objectives inside Wild Zone 2
The scripted sequence inside Wild Zone 2 is short, but skipping the natural order of tasks is the most common reason players end up underleveled for the fenced enclosure event. The order below respects the soft level curve, and it also lets you pick up the largest number of useful items without backtracking.
- Start at the south gate checkpoint and move into the short-grass area to pick up a Bug- or Normal-type team member.
- Cut through the tall-grass patches while pushing toward the wooden bridge, using the bridge as a midpoint to heal and resupply.
- Descend to the riverbank and spend time in the shallow water to add a Water-type encounter to your roster.
- Loop south into the industrial rubble field, which is where the level range edges up and the mid-game evolution items start to drop.
- Approach the fenced enclosure only after the rest of the zone has been cleared; the scripted encounter inside is tuned to the level you reach by the time you arrive.
- Return to the south gate checkpoint to fast travel back to Lumiose and trigger the next story segment.
This sequence is not a hard requirement. The game will let you run straight to the fenced enclosure, but doing so skips the level-up opportunity in the rubble field, and the scripted encounter is tuned to a player who has spent at least a few minutes grinding the higher-level areas. The order above also has the practical benefit of clustering all of the high-XP encounters at the end, so your team is freshest when the levels start to spike.
Level curve and recommended team composition
Wild Zone 2 is the first place where a one-type team starts to feel brittle. The encounter pool pulls in three directions at once: Bug and Grass types dominate the tall grass, Water types dominate the riverbank, and Ground, Fighting, and Poison types dominate the rubble field. A team built around three roles covers the zone cleanly and continues to be useful in Wild Zone 3 and Wild Zone 4, where the encounter pools widen.
| Slot | Recommended role | Why it matters in Zone 2 |
|---|---|---|
| Slot 1 | Bug- or Grass-type special attacker | Handles the tall-grass and short-grass sections, useful against the Water-types you meet on the riverbank |
| Slot 2 | Water-type with at least one neutral coverage move | Reliable in the riverbank, neutral against most of the rubble field, and easy to level because the riverbank respawns quickly |
| Slot 3 | Fighting- or Ground-type physical attacker | Dominates the rubble field and gives you a hard answer to the Steel-type scripted encounter in the fenced enclosure |
| Slot 4 | Flying- or Psychic-type pivot | Optional for the first visit, but useful for skipping dangerous Ground-type matchups once the team starts to specialize |
If you only have access to two Pokemon during your first visit, the Water-type and the Fighting- or Ground-type combination is the most efficient pair. The Water-type keeps the riverbank productive, the Fighting- or Ground-type covers the rubble field, and the Bug- and Grass-types in the tall grass are usually weak enough that you can simply avoid the tall-grass sections on the first pass and return later when your team is at full strength.
Item pickups and hidden rewards in Wild Zone 2
The item economy in Wild Zone 2 is small but meaningful. Most of what you pick up here is consumable rather than permanent, but the consumables are the first set that lets you plan around longer dungeon-like visits to later zones.
- Standard Poke Balls and a few Great Balls: scattered near the tall grass and along the wooden bridge, often behind the railing.
- A single evolution stone in the rubble field: the only guaranteed evolution item in the zone and the reason the southern loop is worth doing even if your team is already at the top of the level range.
- Healing items along the riverbank: usually two or three basic potions and one mid-tier healing item near the bridge.
- A single held item in the fenced enclosure: tied to the scripted encounter and dropped regardless of how the battle ends.
- A small amount of in-game currency from trainer rematches: two named trainers patrol the zone and offer a rematch each time you re-enter, which is a reliable source of early money.
These pickups are deliberately spread out, and the spread is part of the design. The game wants the player to move through the entire zone rather than camping a single encounter hotspot, and the item placement reinforces that movement. If you find yourself short on healing items or evolution materials, the most likely cause is that you skipped either the riverbank loop or the rubble field loop on your first pass.
How Wild Zone 2 connects to the rest of the game
Wild Zone 2 is the first zone in Pokemon Legends Z-A that gates the next story beat on completion rather than on level alone. The story sequence after the zone requires the player to return to Lumiose and report to a specific NPC, and that NPC will not move the plot forward until the fenced enclosure has been cleared. Because the gated story segment branches from this checkpoint, the way Wild Zone 2 is structured quietly sets up the pacing for every zone that follows: the encounter pool, the item pickups, and the level curve inside the zone are tuned to make the rest of the early game feel like a sequence of small, controlled experiments rather than an open-world grind. The broader design history of how catchable wild areas are framed around a hub city is laid out in the entry on the Wild Zone concept on Wikipedia, which describes the same hub-and-zone pattern that Lumiose builds on.
The relationship to the wider open world also matters for completion. The night cycle, the version-exclusive encounters, and the rare spawns that begin appearing in Zone 3 all unlock in part because of the progress the player makes in Zone 2. A player who clears the zone quickly will see the game open up; a player who lingers inside Zone 2 will notice the wider city start to feel quiet, because the game is waiting for the next flag to trigger. That pacing is intentional, and it is the cleanest way the developers communicate that Wild Zone 2 is a transitional map rather than a self-contained area.
Common mistakes when clearing Wild Zone 2
Most first-time players lose time in Wild Zone 2 for one of three reasons: underleveling before the scripted encounter, skipping the rubble field because it looks like a dead end, or over-investing in a single type. The mistakes are not punishing, but they do cost efficiency.
- Entering the fenced enclosure underleveled: the scripted encounter is tuned to a team that has cleared the rest of the zone. Going in at prologue level is technically possible, but it relies on a specific type advantage that is hard to guarantee on a first visit.
- Skipping the rubble field: the southern loop looks visually uninteresting, but it holds the highest XP in the zone and the only guaranteed evolution item in the area.
- Filling the team with Bug-types only: the tall-grass sections are dense, so a Bug-heavy team levels fast, but the riverbank and rubble field feel like walls if you do not add a Water-type or a Ground-type.
- Spending all your Poke Balls in the first ten minutes: the riverbank has a faster respawn rate, and it is a more efficient place to grind captures than the tall grass once your team starts to level.
- Ignoring the trainer rematches: the two named trainers are the cleanest source of in-game currency in the early game, and the rematch cycle is short enough that it pays for your first round of inventory upgrades.
Wild Zone 2 in co-op: how the encounter design changes
Co-op play in Pokemon Legends Z-A scales encounter levels and density rather than doubling the entire zone. In Wild Zone 2, the practical effect is that the rubble field and the fenced enclosure become slightly more dangerous, while the tall-grass sections stay close to their solo-level curves. A two-player team can split the riverbank and the tall grass between them to grind faster, and the fenced enclosure remains a shared encounter that both players have to manage. The night-only encounters scale up as well, which is a useful nudge for co-op teams that want to push the level cap before moving into Wild Zone 3.
One of the quieter design decisions in the zone is that co-op does not change the item economy. The same evolution stone is still in the rubble field, the same held item still drops in the fenced enclosure, and the trainer rematches still reward both players. This is the clearest signal that the developers expected players to repeat Wild Zone 2 in co-op as a way to prep for the harder zones that follow, rather than as a way to grind the area out of the game.
How the encounter pool interacts with the new battle system
The new battle system in Pokemon Legends Z-A is more sensitive to positioning and turn order than previous entries, and Wild Zone 2 is the first place where that sensitivity is obvious. Because the encounter pool mixes Bug, Water, Ground, and Fighting types in close quarters, a player who is learning the turn order display can practice a wide range of opening moves without leaving the zone. Bug-types tend to act first and are useful for learning speed control; Water-types teach the player to watch for weather and terrain interactions; Ground-types punish overly aggressive play, which is a useful lesson before moving into Wild Zone 3, where the encounter pool starts to include more durable defensive types.
The Mega Evolution-adjacent combat layer also shows up here in a controlled form. The scripted encounter in the fenced enclosure is the first time the player sees the new transformation mechanic in a non-trainer context, and the encounter is tuned so that a single failed transformation is not a run-ender. For a player who is still learning the timing and the resource cost, that makes Wild Zone 2 the safest place in the game to practice, and it is one of the reasons the zone is worth returning to even after the story flag is cleared.
Return visits: what changes after the story flag
Wild Zone 2 does not reset the way some open-world zones do. The level range of the encounters shifts up after the story flag, the night cycle adds a small set of new encounters, and the trainer rematches begin to scale. The item economy, however, is mostly fixed: the evolution stone in the rubble field is a one-time pickup, the held item in the fenced enclosure is a one-time drop, and the healing items respawn only on a long timer. For most players, that means the zone becomes a quick stop rather than a destination once the main story has moved on.
That said, the zone is still useful for one specific purpose after the story flag: a controlled environment to test new team compositions. Because the encounter pool is small and the level range is narrow, Wild Zone 2 is a more reliable test bench than Wild Zone 3 or Wild Zone 4, where the wider pool makes it harder to isolate a single matchup. If you are experimenting with a new Pokemon or a new move set, the fenced enclosure in Zone 2 is the cleanest way to run a controlled test before committing to the team in harder zones.
A short field note on encounter consistency
Encounter rates in Wild Zone 2 follow the standard pattern of a creature-collection RPG, which means the same patch of grass will produce the same pool of Pokemon across visits, with only the level range shifting. Spawn density is higher near the riverbank and the tall-grass junctions, and lower in the rubble field. The fenced enclosure is the only encounter that is fully scripted, and it only triggers on the first visit. If you are hunting for a specific species, the practical advice is to move through the relevant terrain section in a loop rather than camping a single tile, because the respawn timer is short but the random element of the encounter table can produce several minutes of empty pulls if you stand still.
The encounter design also rewards preparation. A player who enters Wild Zone 2 with a single status-condition move on their lead Pokemon will have a noticeably easier time catching the higher-level encounters in the rubble field, because those encounters have a higher base flee rate than the tall-grass Pokemon. The difference is small, but it is enough to matter for completionist runs where every species in the zone has to be caught before moving on.
Quick reference table for Wild Zone 2
| Question | Answer |
|---|---|
| Where is Wild Zone 2? | South edge of Lumiose City, accessed through the south gate checkpoint |
| What level should my team be? | Lv. 12 to 17 is comfortable for the main path; Lv. 17 to 19 for the fenced enclosure |
| What types appear in Wild Zone 2? | Bug, Grass, Water, Ground, Fighting, Poison, with Dark and Ghost added at night |
| Is there a story-critical encounter? | Yes, in the fenced enclosure near the south end of the zone |
| Does Wild Zone 2 change in co-op? | Encounter levels and density scale up; items do not duplicate |
| What is the most important item in the zone? | The evolution stone in the rubble field; the held item in the fenced enclosure is secondary |
| Should I clear the entire zone before leaving? | Yes, the level curve is designed to reward a full clear before the fenced enclosure |
Practical checklist before you enter Wild Zone 2
Before you cross the south gate, a small amount of preparation saves a lot of time inside the zone. The list below is short on purpose, because Wild Zone 2 is still an early-game area and the prep cost is low.
- Stock at least ten standard Poke Balls and one or two Great Balls.
- Bring one Pokemon that knows a status move such as sleep or paralysis.
- Carry a small stockpile of basic healing items, since the riverbank pickups are limited.
- Have one team member at or near the upper level of the recommended range, ideally a Water-type or a Ground-type.
- Decide whether you want to clear the night-only encounters on the first pass or return later; the night cycle is the only meaningful reason to revisit the zone after the story flag.
What Wild Zone 2 teaches you about the rest of Pokemon Legends Z-A
Wild Zone 2 is small, but the lessons it teaches are reused in every zone that follows. The terrain-based encounter pool, the soft level curve, the scripted mid-zone event, and the item spread are all patterns that reappear, with the difficulty dialed up, in Wild Zone 3, Wild Zone 4, and the late-game zones. The reason the early game feels controlled is that the developers used Wild Zone 2 as a way to introduce these patterns at a low level, and the rest of the game relies on the player having internalized them by the time the encounter pools start to include rare and pseudo-legendary creatures.
For a player who is just starting the game, the practical takeaway is that Wild Zone 2 is worth clearing slowly. The zone is short enough that rushing it is tempting, but the time spent moving through the full loop, fighting the trainer rematches, and exploring the rubble field is what makes the next two or three zones feel manageable rather than overwhelming. The design is not subtle, and that is the point.
Frequently asked questions
Where is Wild Zone 2 in Pokemon Legends Z-A?
Wild Zone 2 is on the south edge of Lumiose City. You reach it by leaving through the south gate and following the elevated road until the wild zone entrance appears at a small checkpoint.
What level should my team be before entering Wild Zone 2?
A team in the Lv. 12 to 17 range is comfortable for most of the zone, and Lv. 17 to 19 is the right range for the scripted encounter in the fenced enclosure. Players who skip the rubble field often have to backtrack and grind before that fight.
What types of Pokemon appear in Wild Zone 2?
The encounter pool is dominated by Bug, Grass, Water, Ground, Fighting, and Poison types. After the night cycle is unlocked, a small set of Dark- and Ghost-type encounters becomes available near the riverbank and the rubble field.
Is there a story-critical encounter in Wild Zone 2?
Yes. The fenced enclosure near the south end of the zone triggers a scripted encounter tied to the main story, and the next story segment in Lumiose will not unlock until that encounter is cleared.
Does Wild Zone 2 change in co-op play?
Co-op scales encounter levels and density, but the item pickups stay the same. The fenced enclosure becomes a shared fight, and the night-only encounters scale up, which makes co-op a slightly faster grind than solo play.
What is the most important item in Wild Zone 2?
The evolution stone in the industrial rubble field is the only guaranteed evolution item in the zone. The held item dropped in the fenced enclosure is also useful, but the evolution stone is the practical reason to clear the southern loop.
Should I clear the entire zone before leaving?
Yes. The level curve is designed to reward a full clear before the fenced enclosure fight, and the trainers, the rubble field, and the riverbank all contribute to that curve. Skipping any of those sections usually means an underleveled fight at the end of the zone.
What is the best team composition for Wild Zone 2?
A Bug- or Grass-type special attacker, a Water-type, and a Fighting- or Ground-type physical attacker cover the zone cleanly. If you only have two slots, a Water-type paired with a Fighting- or Ground-type is the most efficient combination.
Are there version-exclusive encounters in Wild Zone 2?
Some encounters in the zone are version-dependent, and the wider game uses version exclusives to encourage trade-based completion. The terrain-based encounter pools described in this guide are the same across versions, even when the specific species inside each pool differ.
How does Wild Zone 2 compare to Wild Zone 1?
Wild Zone 1 is the prologue zone and is built around teaching the absolute basics of the new battle system. Wild Zone 2 is the first zone that expects the player to apply those basics against a wider type spread, and it is the first place where underleveling is meaningfully punished.




Leave a Reply